

Diagnosing a Clog in the DTG HM1
Dean Armando
What I normally do is to try to isolate the issue from several possibilities to one. The only way to do that is to swap the cartridges. Follow these instructions to see if it is the damper or the print-head.
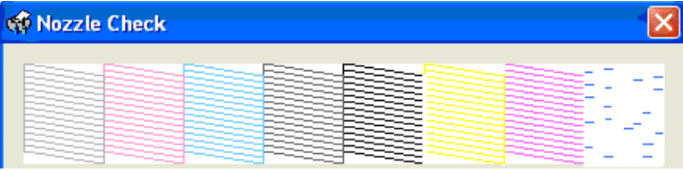
(1) Perform a nozzle check, and note the bad nozzle check and note one which color channels that are printing well. Your nozzle check should look like this:

(2) Let's say that the Yellow is not printing well but the Magenta, and the Cyan, and the Black are, your nozzle check would look something like this:

(3) Simply remove the cartridge from the yellow and swap it with any of the others that are printing well (Cyan, Magenta, or Black). Perform 4 head cleanings and print another nozzle check. Note that the original nozzle check showed that the cyan was printing well and the yellow was not. This would indicate that the Cyan cartridge was not clogged and the Cyan channel on the print head has no clog. What we are looking for when swapping the cartridges is if the yellow prints on the cyan line. Or is the problem the same. The illustrations below simulate what the nozzle check would look like if the clog was in the cartridge.

Note that the Cyan printed well on the Yellow channel, this indicates that print head is not clogged. Now look at how the yellow printed on the Cyan channel, we are getting the same result on the nozzle check after swapping the cartridges that we did when the yellow was on its own port. This would indicate that the clog exists in the cartridge itself, and will need to be replaced.
(4) If after you've swapped the cartridges out you see the pattern below, this would indicate that the cartridge is fine but the Yellow channel on the print head is clogged.
Since we swapped out the cartridges we can see that the cartridge on the yellow is fine since the nozzle check printed the yellow good, but when we put the cyan cartridge on the yellow channel, it did not print a good nozzle check. Again this would indicate a clog in the print head, and this would require the head to be totally flushed out, completely by 20-25 head cleanings with flushing solution to completely clean the inside components of the print head.
The image below indicates the resultant pattern in the nozzle check when the print head and the cartridge are clogged.

Note that the yellow did not print well on the cyan line, that would indicate the cartridge is clogged, and the cyan which printed well on our original nozzle check printed badly when swapped to the yellow channel; this would indicate that the yellow channel is clogged and will require to be totally flushed out using the methods described earlier.
Important Note
Be sure that while flushing out your system, that you draw the flushing solution through the line using your syringe. Make sure you get the lines and cartridge completely translucent. Then after you have finished flushing the lines, place the cartridges back onto the print head in their correct spots, and then perform 20 to 25 head cleanings. Head cleanings work the piezo crystal up and down inside the print head thus cleaning the channel out completely. You will want to do at least 20 head cleanings to thoroughly clean inside that print head.