Flushing with Cleaning Fluid on the Anajet mPower
customer
This is a step by step guide on how to properly flush the system with cleaning solution.
THIS REQUIRES 1 SET OF CLEANING CARTRDIGES.
Steps for System Flush
YOU ARE RESPONSIBLE FOR THE PRINT HEADS
They are not covered under warranty due to clogging issues.
CAUTION: Make sure your waste ink tank is Empty before starting this process.
Step 1:
With NO ink cartridges in the printer, go to Menu, Printer settings and switch the cartridge check to NO.
Step2:
Once the cartridge check is at NO, go into maintenance functions, enter start up fill. Enter fill purge lines first.
Step 3:
Once inside of the fill purge menu, choose 60 seconds. Open the lid to see the white ink exit the tubes. It will take several of these fills at 60 seconds to completely empty the purge lines of ink. Do at least three 60 second fills. If ink is still visible in the purge lines after three fills, continue until the lines are empty. The Purge lines go to the BACK of the print head.
Step 4:
Next, press the enter button with the cursor over Exit. This will turn the pump OFF. After that, go to the Fill Print Lines window. Choose to fill for 30 seconds then open the lid to Flushing the System with Cleaning Solution Page 4 of 5 Technical Support see the ink exit the Print Lines. Repeat the fill for 30 seconds at least three times. If ink remains in the print lines after three 30 second fills, continue the fill until no ink remains in the print lines. The print lines go to the FRONT of the print head.
Step 5:
After flushing both ink systems PURGE and PRINT, go ahead and install all six cleaning fluid cartridges into the printer. Exit the fill PRINT Menu and re-enter fill PURGE lines.
Step 6:
Once inside of the PURGE lines enter 60 seconds to get them filled with cleaning fluid. It should not take too long to fill them since cleaning fluid is a lot thinner than the ink. Fill the Purge Lines at 60 seconds at least two times. Additional fills may be required if two fills do not completely fill the purge lines with cleaning solution.
Step 7:
Next, go into the Fill Print Lines and choose 30 seconds. Fill the print lines at 30 seconds at least twice. Additional fills may be required if the print lines are not completely filled with cleaning solution.
Step 8:
Once the flush is complete, go through the weekly maintenance routine. Clean the nozzle plate, rubber seals on the maintenance station and wiper blade. Print the purge graphic or nozzle check onto a piece of paper or directly onto the platen. If you are able to see ink printing, you will need to go through a few more fills and cleans until ink is no longer visible.
IF ANY PIGMENT IS LEFT IN THE INK DELIVERY SYSTEM, IT CAN CLOG. THE PRINT HEADS ARE NOT COVERED FOR CLOGGING ISSUES.
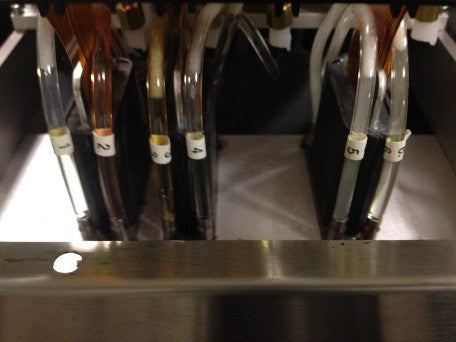
Once the flush is complete, the lines should look like the image below.
MAKE SURE THE WASTE TANK IS COMPLETELY DRAINED BEFORE SHIPPING OR TRANSPORTING THE PRINTER.
Recent Articles