How to Adjust Ink Levels in EZ RIP
customer
EZ Artist and EZ RIP are designed to automatically create gradient underbases (instead of one solid layer of white) by reading your artwork's alpha transparency layer. But sometimes, especially when printing on today's thinner cotton t-shirts, you can get a bright print even by printing less white.
Here are two methods for adjusting the amount of white ink that your Veloci-Jet XL prints to save white ink while still getting a bright print.
1) Especially on thin cotton shirts, print your white underbase at 1440x720 instead of 1440x1440.
2) Adjust your Max Ink level in EZ RIP. Here's how:

Open EZ RIP and go to Printers -> Manage Print Modes
Highlight the Prime print mode that you would like to adjust. In this case, choose Prime 1440 HS (indicated by the red arrow).
Click on Copy print mode in the top toolbar (indicated by the red circle).

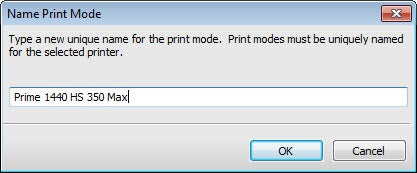
Give the new print mode a name. In this case, use Prime 1440 HS 350 Max. Click OK.
Click the Max Ink tab on the left hand side of the window to select it. Then click the checkbox next to Override print mode max ink data. Then lower the Maximum Ink Level and the Hard Cap Beyond level. They're set at 400 by default, but you can turn them down to 350 or even 300 to get the exact amount of ink you'd like.

Remember that you can come back to this window to change the Max Ink Level or the print mode's name at any time.
Use this print mode in the future when creating your underbase layer. It will put down less white ink while still giving you a bright print on many garments
Recent Articles

Video Replacing the Capping Station on the Veloci-Jet XL
Dean Armando
Subscribe to Media Posts
Recommended for You