
Start Up and Ink Loading on the Texjet ShorTee Garment Printer
customer

After the first powering up of the printer only one (1) ink charge is needed. To perform the ink charges use the Polyprint tool, which can be found in the installation folder of the RIP software C:program Files (x86)>TexjetRip>Tool>PolyprintTool Select the printer and click on ink change. After the ink charge a normal or strong cleaning might be needed.

DO NOT DO ANYTHING TO THE PRINTER UNTIL THE INITIAL INK CHARGE IS COMPLETED. After the ink charge is completed, perform a nozzle check to confirm that all the ink channels were filled correctly First press the Eject button to send the platen out to eject position. Second place the nozzle check sheet on the right corner of the platen in front of you.

Press the home button to send the platen to home position. If the height limit light goes on or if the platen needs height adjustment refer to the section height adjustment. Use the printer touch screen to do a nozzle check. Tap on the service button.

Then tap on Maintenance>Print head nozzle check. Confirm with print
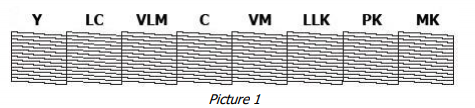
If you see any gaps as shown below perform a Head Cleaning from the printer’s touch pane

Head Cleaning
Tap on the service button
Then tap on Maintenance>Print head cleaning. Confirm with Head Cleaning If the nozzle check isn’t perfect, perform one or two more Strong Cleanings from the Polyprint Tool, until the nozzle check looks like the one in Picture 1. If for any reason the nozzle still isn’t perfect it might be necessary to do another ink charge.
Printing with Texjet ShorTee
Start up: The startup procedure will take about 1 Minute.
Wait for the home screen: Wait until the message in the display shows “Ready”. The green status led (10) will stop flashing and remain constantly on
Place a shirt: Move the plate to the front position by pressing Eject button (11) and place a Shirt. You can use spray adhesive on the plate to make it slightly sticky or you can use the frame plate. This ensures the Shirt lays flat on the media plate.
Adjust the plate height: Use the Check button (2) to adjust the height. And press the scan button (3) to check the platen surface. Refer to the section height adjustment. If the plate doesn’t complete the adjustment and LIMIT led is lightning, move the plate down, until the Limit led switches off.
Send the plate to print position: Press the HOME button (12) or the GREEN button to send the plate to print position. Once the plate height is defined for a kind of T-shirt a readjustment is not necessary until the T-shirt type changes.
Ready to print: When the printer shows the message “READY” on the keypad display (1) you are ready to print.

Related Products


$200

$799.00 | $999.00

$21.99


