
Replacing the Needles on the Brother GT-541
customer1 comment
6-1-4. Replacing the Needles
The Needle can be replaced for every color. The following procedure shows the example of replacing the Needle for "Cyan." The procedure is the same for other colors.
(1) Make sure GT-541 is not in middle of any operation.
(2) Press the OK Button on the Control Panel to display the Menu Display.
(3) Press the Up/Down Button to select "Maintenance", and then press the OK Button.

(4) Press the Up/Down Button to select "Head Replacement", then press the OK Button.
(5) Press the Up/Down Button to select the color for the Needle to be replaced, and then press the OK Button.
The message "Replace [X] Ink Cartridge & Press OK." appears:
(6) Remove the color's Ink Cartridge, and then press the OK Button.

The message "Set Filter Cartridge & Press OK." appears:
(7) Insert the Filter Cartridge, and then press the OK Button.

The ink-draining begins. Wait until the message "Turn Off & Please Change [X] Head." appears:
(8) Turn off GT-541.
(9) Open the Front Cover as unlocking the Cover Locks.
You can find the Print Heads on the left.

(10) Turn and remove the Tube Clamp connected to the Needle, and then disconnect the Tube.

(11) Remove the hexagon nut.

(12) Remove the Needle by hand from the Cartridge Holder side.
<Note> Be careful not to be injured with the sharp point of the Needle.

(13) Fit the new Needle in the oval hole on the Cartridge Holder so that the linear sides of the Needle's flange align with the linear sides of the oval hole.

(14) Fix the Needle by tightening the hexagon nut, then fit the Tube to the Needle, and then fasten the Tube Clamp.

(15) Remove the Filter Cartridge, and then Insert the Ink Cartridge.

(16) Close the Front Cover, and then turn on GT-541.
(17) Press the Platen Button to eject the Platen.
(18) Press the OK Button to open the Menu Display.
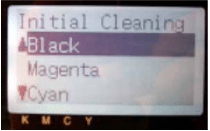
(19) Press the Up/Down Button to select "Head Cleaning", and then press the OK Button.

(20) Press the Up/Down Button to select "Initial" cleaning mode, and then press the OK Button.
(21) Press the Up/Down Button to select the color you have replaced the Print/Head, and then press the OK Button.
The following message appears, and the initial cleaning starts.

The display returns to the Print Head color-selecting display, when the initial cleaning has been completed.
(22) Print and check the Nozzle Check Pattern (see "2-6-3. Test Print").


Comments (1)
Where can you find tube clamps? If hypothetically you dropped and stepped on one….